
Hello Lovelies,
What a treat I have in store for you today!
In conjunction with the awesome Sarah from Little Dot Photography, we have brought you a great 4 part beginners guide on blog photography!
As an aside, Sarah and I have known each other for over a decade now (I think) and she knew me waaaay back when I thought short hair and a visor were the ultimate style for me.. as well as wearing jeans so wide and baggy you could hide small children in them! Yep, we were teenage hippies but I think we’ve both out grown those days now…. if not grown out of the piercing malarky yet!
After each weekly session, you can use the comments section of this post to ask Sarah questions and she will do her very best to answer them.
So now I will hand you over to Sarah….
Are you a blogger in photographic despair!? Fret no more, you can take your own decent photos….yes you can!
Do you enjoy updating your blog with your latest fashion purchase or your newest make up range? Do you love flashing your new sneaks to the world wide web but never quite feel that your doing them any justice? Well don’t fear, the ‘how to’ guide is here. Whether you’re a brand spanking new beginner at picking up a digital camera or a seasoned amateur, my aim is to point you in the right direction to take some pretty decent shots to flash on your blog and show off your beloved items as best you can!
Over the next four weeks there will be a new nugget of information for you to digest and master in your quest for photographic wizardry!
Week 1 – How to get good lighting:
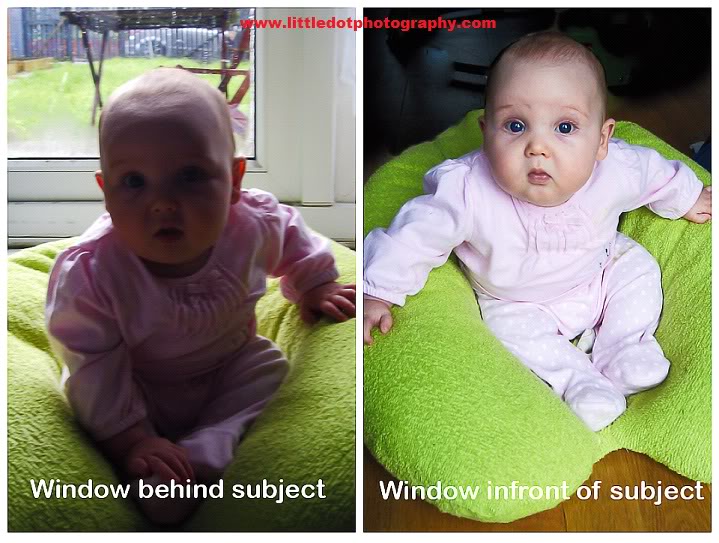
Lighting is the most important thing in photography. No light equals no picture. Try to take your photographs in natural light. If that shot of your favourite mascara or book can wait until daylight hours, then do it. Positioning your subject in front of a window is the easiest way to get as much natural light onto it as possible, however make sure the window is also behind the camera otherwise the window will look great, your subject however, will look like a silhouette!


Lastly, don’t set your camera to night mode to try and take the photograph in darkness. Unless you’re taking a picture of something very still and your camera is sitting on a tripod, and you have it set to self timer, it just isn’t going to work…trust me!


Great Post. Looking forward to reading the rest of the series.
Really handy! Will look forward to the next one!
X
Great post! Looking forward to the next one. I’d love to see some tips in regards on how to use the manual settings.
xx
I sure need this series of posts!! Thank youuuu x
Great post! I feel like photography is where I fall down a bit, so these will be really helpful! x
Thank you for your comments 🙂 you never know, I might put something together for those of you who want to venture into the world of manual…it’d be fun!
Wow some really good tips here! I am such a luddite when it comes to photography so this is really useful x