Syn Free Battered Garlic Mushrooms + ‘Sour Cream’ dip

Hello Lovelies


Here’s my tasty recipe for syn free ‘battered’ garlic mushrooms.


Serves 2 as a main accompaniment or 4 as a small side dish. Can be served hot or cold and used as snack food.


Ingredients
Cous Cous – You can either use this uncooked for super crunchy mushrooms or prepare it and leave it to cool for medium crunchy.
2 eggs beaten
Spices
Garlic -Whatever form you like but not puree
Button Mushrooms x 1 tray
Kebab Skewer or cocktail sticks


For the dip
5 + tbsp Fromage Frais – however much you like
Chopped fresh herbs
Salt & Pepper
Tabasco
Garlic salt


Preheat the oven to 200 degrees


Clean and prepare the mushrooms by removing the stalk in one piece and brushing them down


In a bowl I mix 1 large tbsp of Lazy Garlic, a dash of Garlic salt and some tabasco sauce / spices


Spoon enough of the garlic filling to fill the recess in the mushroom and then insert the skewer


Using the skewer, cover the entire mushroom in egg wash and then coat liberally in the cous cous. The dried cous cous sticks easier but goes super crunchy, the cooked doesn’t go as crunchy but is a bit sloppy to work with. Both are equally as tasty


Place on a baking sheet and bake in the centre of the oven for 15-20 minutes or so. You can check the mushrooms are cooked by cutting one in half near to the end of cooking time.


For the dip, place all the ingredients in a bowl and mix well. Add further seasoning as necessary and serve in a little dish to dip your mushrooms in to

Share:

Make Up Store Tri Brow

Make Up Store Tri Brow

Hello lovelies, 


I was a little obsessed with my HD brows palette for a while but after a freak accident, the shade I was using somehow crumbled and broke, I have been stranded in brow limbo! I have super fair blonde eyebrows and they are pretty sparse too. I keep them waxed in to a pretty thin line and then dye them just to bulk them out a little. They always need filling in too.


Recently, Make Up Store came to my attention and more specifically, their eyebrow trios. The middle shade is a perfect ashy taupey brown colour that closely mimics the HD shade. I’ve used this kit every single day since I got it and it’s brow love!

The trio is a nice dinky little size that takes up no space in my travel kit which is a huge bonus for me! 


The powder itself is divine. It feels almost creamy when you run your finger over it and I don’t get any dusty fall out on either the pan, my brush or even my brown. Finely milled and so smooth. The texture is just a pleasure to use.

I know a lot of people loved the HD brows because it came with a huge mirror and brush inside which made using the palette on the go easier, but I’ll be honest…. I don’t leave the house without my eyebrows “on” so I don’t really need to use this in situ throughout the day.

The selection of colours is great. The darkest colour works well on black and dark brown brows as well as setting gel liner whilst the mid tone and light shade work like a gem on lighter eyebrows.

I love the packaging, it has a luxe feel to it without the hefty price tag.

If you are eyebrow challenged like myself, or just want to be a little more groomed, then Make Up Store’s eyebrow trio is definitely the one for you!


You can buy Make Up Store Tri Brow kit here for £16.00

I have the foundation and powders on my wish list next!! Can’t wait to try those!


What do you use on your eyebrows? Have you tried Make Up Store before?

Stay tuned for something very exciting coming soon from Make Up Store here on www.ladyfromatramp.co.uk

Share:

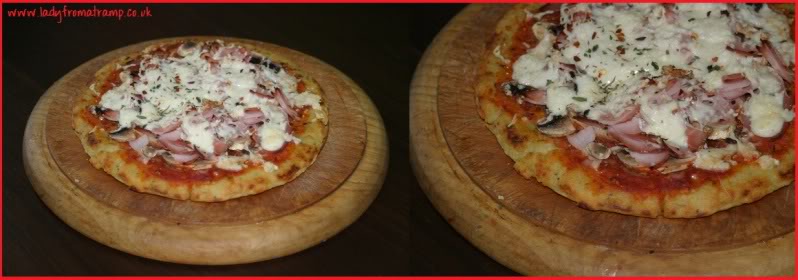
Syn Free Pizza

Syn Free Pizza

Hello Lovelies 

I tried this at the weekend after a bit of trepidation and I was suitably impressed. Bit of a taste sensation to get your head used to but if it’s another syn free take away alternative then it’s worth a try isn’t it?

What I will say is you’re best off making this base quite thick so that it is nice and firm. I used a 8″ frying pan and I probably wouldn’t go any larger than that. You can easily make 2 bases one after the other and bake them together.

Makes 1 pizza which serves 2 as a lunch snack or with accompaniments for tea or 1 very hungry slimmer! 

Ingredients 


120-125g mashed potato flakes (Smash or stores own brand both work the same)
Boiling water
Fry Light
Mixed herbs
Garlic ( any form you like but not puree in a tube)
1-2tbsp Passata / tinned tomatoes (not puree)
Chilli flakes / tabasco (optional)
Topping – Ham and Mushroom for me, both are syn free so you can pile it high.
Grated Cheese – You can use your HEXA allowance for this or syn it.. Of course using the HEXA makes it syn free

Method


Preheat your oven to 200 degrees 

In a large bowl, mix your mashed potato flakes with a little mixed herbs and garlic salt and with enough boiling water to make a firm dough, as if you were baking bread. Allow this to cool.

Once cool, warm a small frying pan and spray liberally with Fry Light to avoid sticking. 


With your hands and a spoon, mould the potato dough in to the frying pan in a giant patty that fills the pan completely. Make sure the base is even and there are no holes.

Fry on a medium heat for around 5 minutes on each side until a lovely deep golden brown colour. You will need to flip the base over using the plate and pan method so that it doesn’t break whilst flipping. Leave to cool on a wire rack to help the base crisp up.

In a bowl, mix your passata with your additional flavourings such as garlic herbs and spicyness and spread across the base.

Pile on your toppings and then lash on the cheese. Word of warning… I tried to use my 2 babybell lights grated on top and the melt wasn’t fantastic so definitely worth using the hard cheese HEXA option.

Put the pizza on a pizza tray / wire rack / grill pan and bake in the oven for 15 minutes or until the pizza base has deepend in colour and the cheese is bubbling away nicely.

You might need a knife and fork to eat this as the base is never going to be as rigid as a proper pizza but you can still pick it up. The only thing I can liken the base too is potatoe smiley faces. Crispy on the outside but fluffy and potatoey in the middle.

We thoroughly enjoyed this and I hope you do too!

Share:

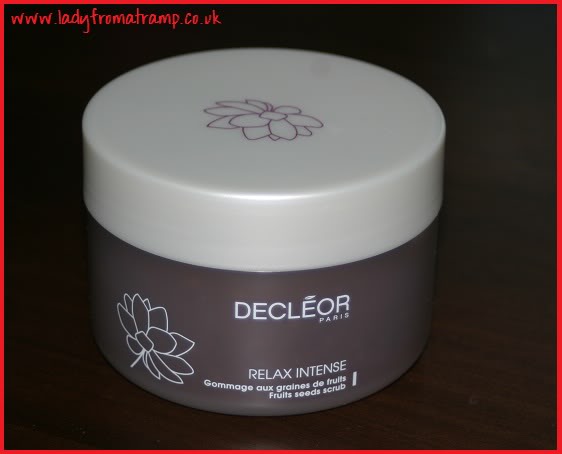
Decleor Relax Intense Fruit Seed Scrub

Decleor Relax Intense Fruit Seed Scrub

Hello Lovelies,

Now I’m not one to religiously use a scrub. I keep one in my shower but I just forget and it only comes out like a knight in shining armour when I’m just about to fake tan. This couldn’t have arrived at the more perfect time. I’m about to do a nice rich spray tan prior to my weekend in London so I need to buff away all the dead skin.


The Relax Intense smells absolutely divine. It really does have a high end spa smell to it. Not too girly or fruity. I’d wear it as a perfume if I could!

When you take the lid off, I was shocked to see how thick and gelatenous the scrub is. It is a dark brown treacley colour and it full of natural, fruit seeds to buff you down to your gleaming self.


The thick consistency makes it an absolute treat and thankfully it doesn’t leave behind a slimy flim after use. It left me feeling moisturised yes, but not that gross slime film.

Over all, I absolutely love this product and I can see me getting a lot of use out of this, my only negative comment is that I would have liked to have seen more seeds for a more abrasive firmer scrubbing action but again, if you aren’t a body scrub masochist like I seem to be, it’s a lovely gentle yet highly effective scrub. You can see and feel the results after just one use.

This jar is going to take pride of place in my shower AND I’m actually going to use it. I can’t wait to discover more of the line… I just hope they all smell as good as this one! Yum!


Have you used Decleor before? What are your favourite products from their line?


Photobucket     

Share:

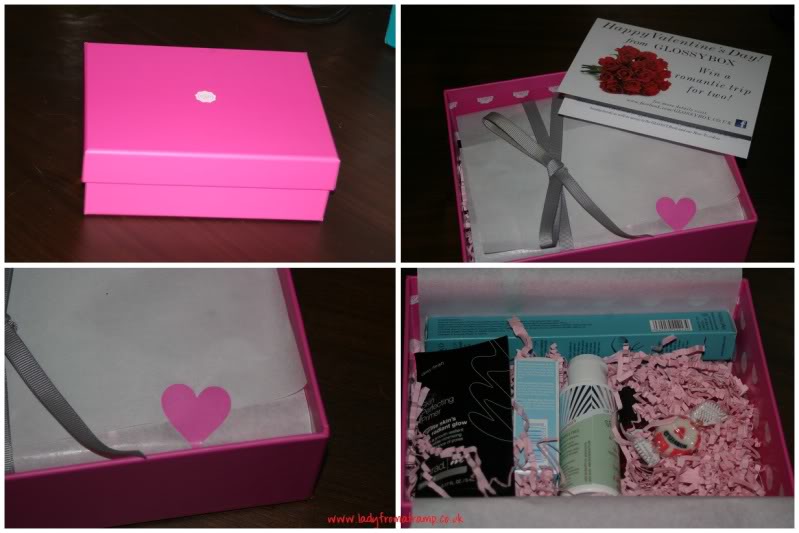
Glossybox January 2012

Glossybox January 2012

No words for a change, all pictures…..

    Photobucket

Share: