China Glaze Ruby Slippers

China Glaze Ruby Slippers
Check out ma pimp slippaz yo!


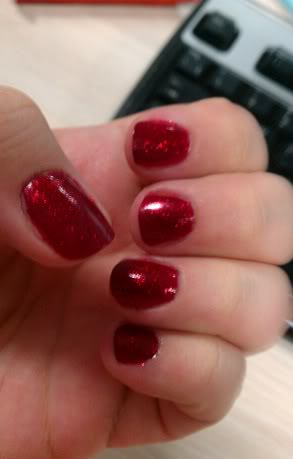
Ok ok so I don’t actually talk like that, I was just feeling a little bit gangster! I did a NOTD with the red glittery Ruby Pumps.


I was expecting red glitter suspended in a clear gel but this polish had a red tone to it to give good coverage as well as glitter.

For this NOTD I used the obligatory basecoat followed by 1 coat of Nails Inc red just to boost the red tones of the China Glaze. Once dry I applied 2 good coats of the China Glaze to build glitter coverage. This polish is SO amazing. The depth and quality of the glitter is out of this world – I’m in love! The China Glaze does dry to a slightly gritty finish so I applied a coat of the free China Glaze top coat to finish my manicure off.

I am mesmerized by the depth and tones of this polish. In some lights it just looks like a flat metallic ruby red then in others it springs to life like a big red disco on my fingers!

This was my first venture in to China Glaze and I was so impressed I’ve since went on a bit of a CG purchasing rampage! What’s a girl to do, I neeeed more China Glaze in my life ladies!

Share:

Sunday DIY : Treatment for dry hair

Being the frugal diva that I am, I got sick of spending my pennies on deep conditioners that just didn’t seem to work. Lord knows my bathroom is full of products I’ve tried.
I am even writing this while wrapped in clingfilm, as a deep treat before I go out tonight!

After a holiday in Marrekech (and stocking up on pure Argan Oil!), I learnt about just using a good, pure, olive oil to make a DIY treatment which nourishes and conditioners where it’s needed most. – I mentioned it a little bit here – Moroccan Oil Review

I hotfooted it to the local supermarket and picked up a small bottle of olive oil for <£2 and followed the instructions I’d cobbled together from Google.

.Apologies if this is something everyone knows, my mother says she used to do it in her youth too, but a lot of people I have spoken too are oblivious… This is my how-to :


You need :
Old t shirt / vest
Olive oil
Shower cap / cling film
Hair dryer
Hair bobble (optional)
 
1. Fill a sink with hand-hot water and put the bottle of oil upright in the sink to warm up. It needs to be warm but not chip-fat hot! I feel like it penetrates better when warm but that could be all in my head!

 2. Start with small amounts, apply to DRY hair, starting with the ends and working your way up the hair shaft. I personally find it easier to put my hair in to a pony tail to coat the ends, take it out then work a small amount of oil in to the roots – mids. You can skip the roots if you feel its better suited to your hair


3. Once you have oiled up, I usually put a shower cap over my hair to keep the heat in and contain the mess or wrap my hair in cling film. I always follow up with a gentle blitz with a hairdryer to increase the warmth and in theory the penetrating power.

4. I leave the oil on for as long as physically possible, usually 2hrs +. I get better results if I can leave it on over night but any length of time is better than nothing right?! I wouldn’t recommend this as a 5 minute jobby, it needs penetration (oo-er) time.

 5. When its time to wash the oil off I have a huge tip here – put the shampoo on before you add water (oil repels water!) and make it in to a lather before you wet it. It might take you 2 washes depending on the strength of your shampoo.


I find that doing this to your hair every 3 or 4 weeks leaves the ends so sleek and silky soft and for the price it’s natural and cost effective as I’d guess you’d get about 10 treatments out of a bottle for shoulder length hair.

I tried to do this once a week when my hair was in dire need but the 2nd week made no difference which to me would suggest the shaft is still full of the original oily nutrients!

I have yet to try almond oil, which is also meant to be good for a sore scalp as well as nourishing the hair.

Has anyone else tried a DIY hair treatment?

Share:

Review : Moroccan Oil Treatment

Review : Moroccan Oil Treatment

I have been in 2 minds about trying Moroccan Oil as I thought it was insanely expensive for what is essentially a jar of posh cooking oil. (artistic licence on that one!). 
The reviews and results were unequivocally good, but £30.45 is a hell of a lot of money to pay by most peoples standards.
While on holiday in Marrakech I was introduced to pure Argan oil by the female producers in their small co-op Berber pharmacies high in the Atlas Mountains and thought it was about time to get on the ‘moroccan oil’ band wagon. A 100ml bottle of pure Argan Oil for hair use cost me £4 so you can see why I find £30 to be excessive! The ladies were sweet and took their time to show us their extremely long and extremely well conditioned hair and their tips to get the most out of oil treatments (longer DIY post to come soon!)
After a week in the 120 degree heat my hair loved the deep treatment from the oil and it was left softer and silkier than any other conditioner I have ever tried – I was sold!
Now time to enjoy some gratuitous holiday snaps…..
A traditional Berber Village
A Berber lady working the husks in the co-op Pharmacy


A mini production line for treating the husks
As tradition in Morocco, when a guest in someones home (the pharmacies are in houses) you’re given glasses of hot sweet mint tea
Once my hair has improved in condition, I find the pure Argan Oil far too heavy to use regularly so I now save my precious bottle for those times when your hair needs some lovin’.
At Christmas, my lovely husband bought me a Moroccan Oil minis kit from www.lookfantastic.com , who stock a good range of Moroccan Oils (and far too much other amazing hair goodies – bye bye pennies!). I tried the oil with trepidation after a wash & condition, just applying the tiniest amount to my ends, knowing that the pure A.O was too much for healthy-ish hair.
I followed my usual blow dry routine and I was so so impressed. Not only did my hair feel less dry and strawlike but it looked amazingly healthy and nourished! The ends were so well behaved and sleek, I had no need to use serum after my blow dry. That alone for me is a huge improvement.
I have played round with quantities and how I place it through the hair and I have found a 5p size blob, spread between two hands and then worked from my ears down to tips gives me the best results as I have layers in this area and it makes sure all the tips get a coating. The final results are just fab! I hate to admit but this is my holy grail of hair products and I have been out and re-purchased the big 125ml bottle (100ml bottle for £30.45 here on lookfantastic.com).
My mother is by biggest hair critic and even she can tell the difference to the quality of my hair, so if it’s noticeably different to others it must be good right? 
I use the moroccan oil every time I wash my hair and feel that it handles better with the oil, the ends are easier to curl under and the tips don’t get so ratty on the 2nd day. I have also applied a small amount on the 2nd day before if I just want a bit of extra taming. It smells absolutely devine too!
Now let me say, this is by no means a deep treatment oil but it is a daily godsend for styling and conditioning. You’d eat through a 100ml botle far too quickly trying to do a Deep Treat with this oil, but your hair does soak it up a lot quicker when it is in need of more nourishment.
All in all, I am SO happy that I tried the Moroccan Oil and im glad its made its way in to my daily routine to replace loading up my hair with silicone based serums which hide rather than tackled my frizzies.
My only complaint is the price. I think it’s a diabolical price for 100ml of oil. I did re-purchase the oil in its full size bottle but only after trying it. I would never have bit the bullet and paid the £30 without trying it first. I have used roughly 25ml in 2 month so it’s not too bad but I know the price puts a lot of people off – I hope this review will help encourage people to take the plunge and try it!!
I can’t wait to try the rest of the Moroccan Oil range, the deep conditioners and styling products are calling out to me… but as ever, I’ll have to save up some pennies before I can review them for all my lovely readers.
Share:

Review : LUSH Bubblegum lip scrub

Review : LUSH Bubblegum lip scrub

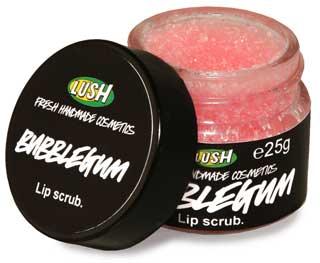
Just a small review about Lush’s Bubble Gum Lip Scrub < note that this is a link to the American Lush as our UK site is still down after the Christmas hacking!

I’ve looked at it since it was launched and always felt it was a bit gimmicky so never bothered. As this was to be my first Lush purchase for myself so I thought I’d give it a twirl.

Oh man, I wish I’d bought this years ago dammit!

The smell and taste of bubblegum is strong but not overpoweringly so and the sugar crystals provide enough gentle exfoliation to turn the flakiest kisser in to a smooth plump pout without it being painful and ‘raw’

I like to apply this morning and night right across my lips and slightly extending in to the skin to make sure the lip line is smooth too. I follow it up with a slather of a thick lip balm to provide further moisturising.

The scrub itself leaves a little deposit of oil on the lips after scrubbing but its no where near enough to rely on as a balm.

For £4.99 this is a perfect little pot to keep in stand by for lip emergencies. The tub will last me a very long time as a little goes a long way. It is very easy to use while it is full but I think I might struggle as it gets near the bottom, without the aid of a long nail or something to fish the grains out of the bottom.

Share:

Review : MAC Make Up Session


Make Over or should that be MAC Over?

For Christmas, my father in law bought me a voucher for a MAC session!

Oh how excited I was about all that lovely MAC make up!

Lets be honest now ladies, MUCA (My code for – make up counter assistants) do have a reputation of being snooty orange faced clowns right? Remember that Fast Show sketch? (YOUTUBE)… well this was playing heavily on my mind.

I have about 70% of MACs regular range of eyeshadows and pigments and a healthy dose of their lippies and gloss’s so I didn’t want the kind of make up lesson you’d give to a 15yr old with her first lippy, but I also didn’t want to be brushed aside and given the same look I could do every day.

Sunday 6th February at 11:00 – Judgement Day! Dun dun duuuun!

When I sat down with my MUCA, she was amazing. She told me she’s known as Pink Sarah and what an absolute doll she was! I wish I could have taken her home with me! She put me at ease instantly when I told her I didn’t want to look like a clown. We had a good laugh over my trepidation about the session and she did her best to put me at ease.

I explained to Sarah that I have very rosy cheeks and as such my main goal for the session was to finally find a properly matched foundation to give me maximum coverage without looking like a mask so that I could wear blushers!

Sarah ran through a few foundations and let me choose which one I felt most comfortable with (NW20) and I have to say I’m insanely impressed! I have not tried MAC foundations before, with having problem skin I avoid introducing new (and expensive) products which may cause flare ups but almost 2 weeks on of daily wear I have nothing to write home about.. Yes that’s right, ive worn it every day! The first time in about 4.5yr! It’s a BIG achievment for me and my stupid face!

Sarah asked me what kind of style of eyes I go for and after I explained my usual style and colour preference she asked if I was feeling brave enough for a bold purple ‘daytime’ look. Confident that she’d not make me look like Krusty the Klown I was game for her to go to town on my eyes!

WOWOWOW! < That’s all I can say! I associate bold purples with night times but Sarah worked her magic on me and I had a beautifully vivid smoked purple eye with bold tones running through. She was attentive to ask about my eyewear (I’m a speccy 4 eyes) and explained how to create a bold eye that was maximised by my frames. It was a revelation to me as I’m prone to applying my eyes as if I was wearing my contacts and then just shoving my glasses back on!

All in all I was very very happy wth my session and felt relieved I’d been brave and gone through it. I was grateful she didn’t try to teach me to suck eggs, but I did pick up a few tips I’d not thought about before that Ive used again since. She wasn’t pushy or forceful when it came to deciding which products I would like to buy (£98.50 of goodies for the record… ooopsie!)

Sarah was an absolute sweetheart and I have to say, after previous VERY frosty service from the MAC ladies she was perfect in every way. This was reaffirmed when on returning to MAC a week later to swap a dupe eyeshadow I’d bought after the session, she made a beeline to me and gave me the warmest greeting I think ive ever had and checked how I felt after id got home with the make up she applied. Such a lovely lady!

For all you North East ladies, I cannot recommend Sarah (Ask for Pink Sarah) in Fenwicks in Newcastle highly enough. She is amazing and a real credit to the brand, if this is the quality of representation they offer. The other girls on stand could take a leaf out of her book for customer service.

I was actually so impressed with Sarah I have wrote an email of commendation to both Fenwicks & MAC directly!!!

After a slight absence from MAC-love (due to shoddy service)…I’m back with a bang! Now where is that Chrome eyeshadow and Venetian lipglass!!
Share: